Building a Markdown-driven blog using Next.js 13 and App Router
Contents
- Introduction
- Who is this aimed at?
- Project setup
- File-based routing
- Creating blog posts as Markdown files
- A list of posts - the Homepage of our app
- Individual post page
- Accessing the post that the slug refers to
- How to render dynamic pages statically
- Separating content from frontmatter
- Parsing the Markdown
- Updating the links on the index page
- Conclusion
Introduction
This article explores the process of setting up a blog application using Next.js where blog posts are written in Markdown and stored in the same repository as the app. We will be using the latest version of Next.js at the time of writing, version 13, along with the new App Router. Hopefully this will be useful if you are migrating from a previous version of Next.js.
We will explore:
- Next.js routing
- the format of Markdown files
- different methods of rendering pages
- how to convert Markdown to HTML
This article will not touch on styling at all.
Who is this aimed at?
You will need to have some React knowledge, specifically how to create functional components and an appreciation of props. Some fundamental JavaScript knowledge will also be useful.
You don't need to have used Next.js before. If you have used a previous version, or version 13 using the Pages router, I have tried to highlight differences where appropriate.
Project setup
We are starting with a completely blank slate so the first thing to do is initialise a new Next.js app. In your terminal navigate to the directory in which you want to create the app and run:
npx create-next-app@latest
If you are asked to install the create-next-app package, type 'y' to accept.
After executing the command you are taken to an interactive prompt session where you are asked a few questions. The answers to these questions determine how the create-next-app package will scaffold your project. You can see an example of the questions, together with my answers below. If you want to follow the steps in this article make sure you say 'Yes' to the App Router question.

You can see that I named my project 'nextjs-markdown-blog' and the Success! message right at the bottom indicates that a new directory has been created with that name, inside the directory that I was in when I ran the create-next-app command. The line above that also indicates that our new directory has been inialised as a Git repo. Nice!
Let's switch into that directory:
cd nextjs-markdown-blog
Starting the server
The create-next-app package adds an example homepage so we can spin up a local server and take a look at it.
Run the command npm run dev in the terminal at the root of the project. The app will be compiled and a server will start on, by default, port 3000. Open a browser and navigate to localhost:3000 and you should see the example homepage, something like this:
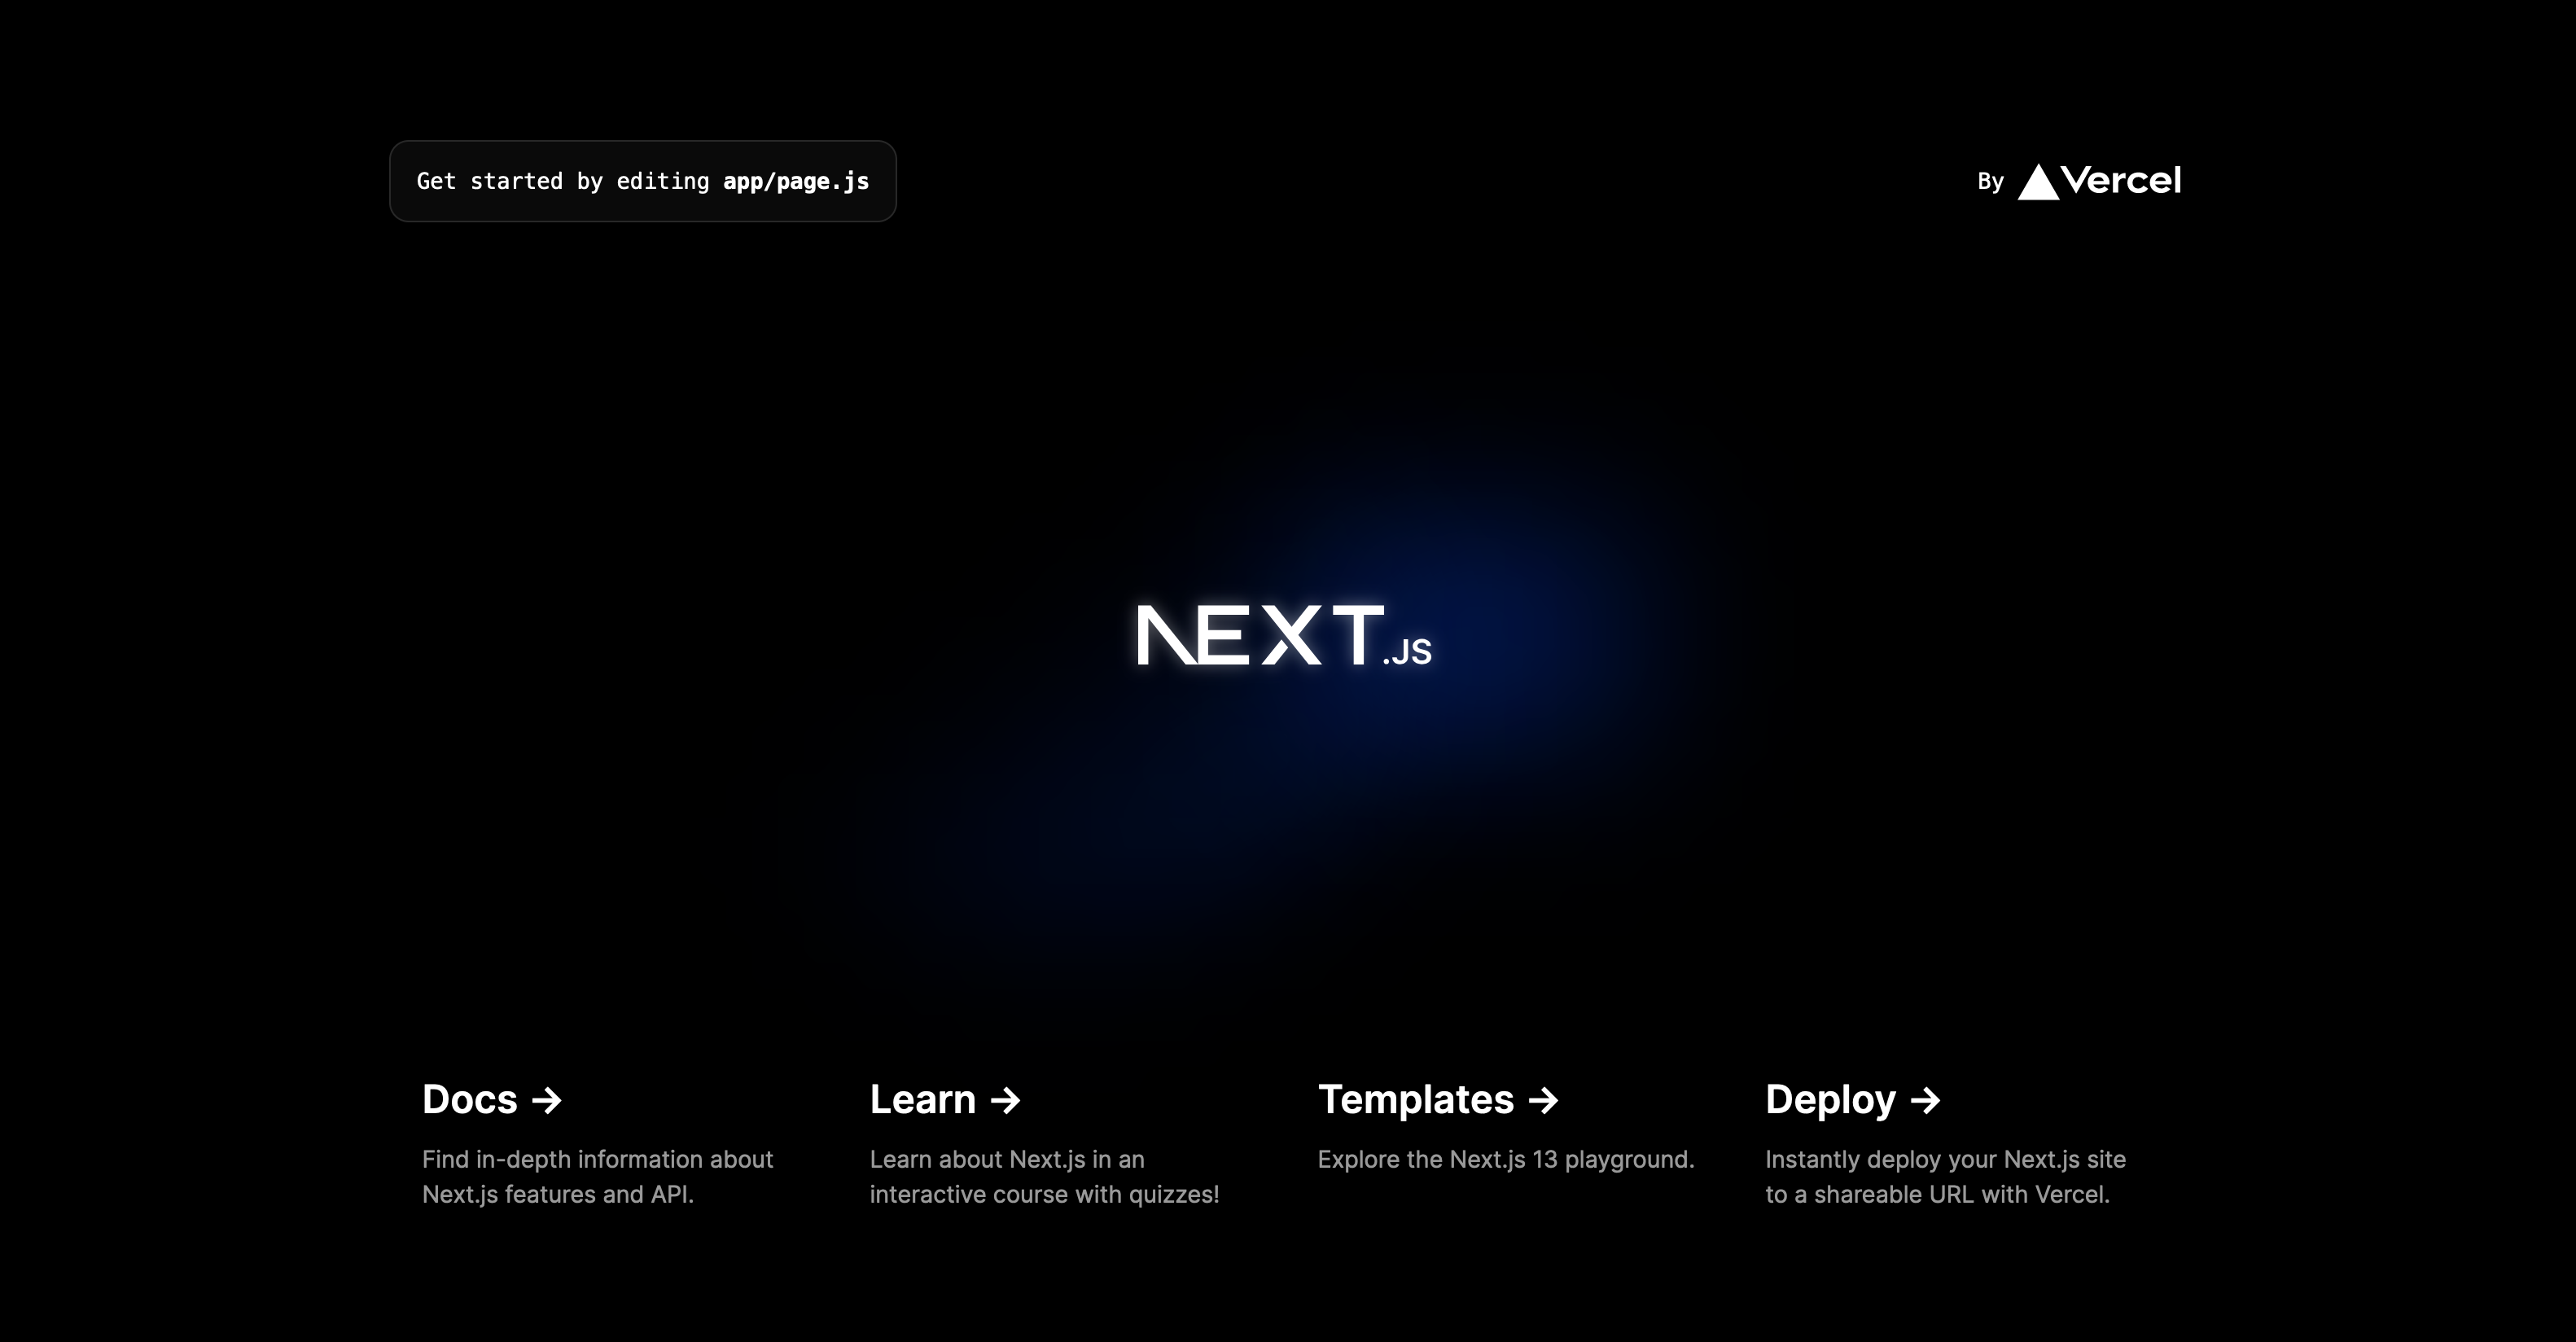
I mentioned at the outset that we will be exploring some new ways of doing things with Next.js. In the top left corner of this example page is an indication of the first new thing. It says Get started by editing app/page.js. That shows that we are using the Next.js App Router (more on that later).
The anatomy of a Next.js app
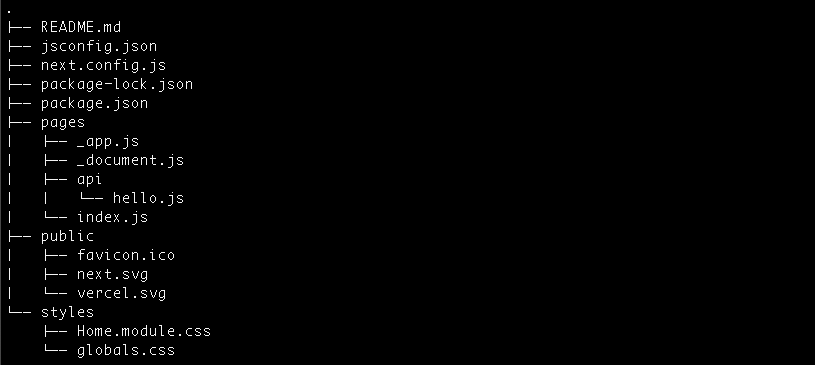
Inside our new directory, the file structure looks like this:

If you have used Next.js and its Pages Router then this structure will look a little different from what you're used to. At the end of this section I have added a brief explanation of what's changed. For now, let's explore some of the files & directories we see here.
Open the nextjs-markdown-blog directory in your favourite code editor and explore the project:
The app directory
This is where the 'pages' of your app are defined. In broad terms, the structure of your app directory determines the structure of the app or website.
page.js
The page.js file in the app directory contains the homepage component. In other words it's the root of your site: the component that will be rendered when https://your-domain.com/ is requested.
Open app/page.js in your code editor and you will see the code that renders the example homepage above. It contains a function called Home which is a standard React functional component. What turns it into a Next.js 'page', with its special routing behaviour, is its location in the file structure.
We will cover this in more detail in the section on file-based routing below.
layout.js
As the name suggests, layout.js files govern the overall layout of pages. Open app/layout.js in your code editor and you will see that, similar to page.js, it holds a standard React functional component that returns an <html> tag. Inside the <html> tag is the <body> tag. And inside the body tag we return the content of the children prop. In this context children refers to all pages in the app directory. So app/layout.js wraps every other page. It is referred to as the Root layout.
It is possible to nest layout.js files in other page directories that are themselves nested within app but that's beyond the scope of this article. Refer to the docs for details.
One other aspect of the Root layout file that you have open is that it exports the metadata object. That is one way to tell Next.js what to include in the <head> element of a given page. Again, you'll need to refer to the docs for full details.
While you have layout.js open you can delete the line that imports globals.css. We won't be considering styling in this post.
The public directory
This is where we store static files, like images. Assets in that directory can be served by Next.js. You will notice two .svg files in that directory after the app has been initialised: next.svg and vercel.svg. They are images used in the example Homepage.
Refer back to app/page.js in your code editor. Locate the <Image> component that renders the Vercel logo (line 19 on my machine). Notice that the path in its src prop is '/vercel.svg', which points to a file stored in the root of the project. That tells us that public represents the root.
Note don't change the name of this directory: it must be called
public.
We can nest other directories imside public. If we create a public/home directory and move the vercel.svg file into there, we would need to change the path in the src prop to: '/home/vercel.svg'
global.css
As you would expect this is a top-level css file in which we can define global styles. This gets imported into the Root layout file so the styles apply app-wide. You deleted that import statement in layout.js a moment ago so the styles defined in here will no longer be used.
page.module.css
I only want to mention this file to point out that Next.js supports CSS modules out of the box. You don't have to use CSS modules though; you can define your styles in whatever way you like.
Differences when compared to the Pages Router
If you have never used the Pages Router feel free to ignore this little section and move on
Below is a screenshot of the file structure immediately after initialising a Next.js app using all the same settings as I did above except I answered 'No' to 'Would you like to use App Router?'
The biggest difference is that, in App Router configuration, the pages directory is replaced by the app directory and, within that directory, index.js is replaced by page.js.
Broadly speaking, _app.js and _document.js are replaced by layout.js. The finer details of the differences are beyond the scope of this article.
File-based routing
If we want to use routing in a pure React application we have to call on an external library because React doesn't support routing out of the box. The usual choice is React Router.
That works by wrapping our custom components in React Router components which take props that define the route. A very simple example (using React Router v6):
function App() {
  return (
    <BrowserRouter>
      <Routes>
        <Route path="/" element={<Home />} />
        <Route path="/about" element={<About />} />
      </Routes>
    </BrowserRouter>
  )
}
It's a fairly easy concept to grasp but it can get unwieldy and difficult to maintain as your app grows.
Next.js takes a completely different approach. If you have ever built a static website with just HTML & CSS files, where the structure of the site mirrors the file structure, then this will quickly make sense to you.
We have already discovered that the app directory is the container for all of our pages, and those pages are defined in page.js. Let's dig a bit deeper into that.
Imagine you are building a portfolio site with the following pages: Home, About, Portfolio & Contact. Your app directory might contain this structure:
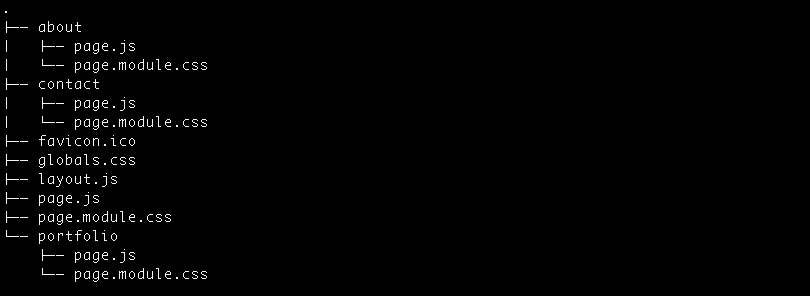
Simply structuring your files like that will ensure that:
app/page.jswill be rendered for visitors to www/your-domainapp/about/page.jswill be rendered for visitors to www/your-domain/aboutapp/portfolio/page.jswill be rendered for visitors to www/your-domain/portfolioapp/contact/page.jswill be rendered for visitors to www/your-domain/contact
That is a basic example, and it assumes that all of those pages contain static information, but hopefully it gives you a feel for how file-based routing works. We will dive deeper into this subject later when we build a page that renders a single blog post.
Creating blog posts as Markdown files
Before we get into coding the application we need some blog posts for it to display. If you have Markdown files that you can quickly lay your hands on then feel free to use those; we'll need at least three. Otherwise you could copy the example files from this GitHub repo.
Create a new directory called posts in the root of your project and place your Markdown files in there.
New to Markdown?
If you have ever created a README on GitHub then you will have dabbled in Markdown. But if it's all new to you, or you are only comfortable with the basics and want to learn more, take a look at the Markdown Guide for the low down on what you can do with it.
Markdown frontmatter
If you look at my example Markdown files linked above you will see that each one has a section at the top wrapped in lines containing 3 dashes. In the Markdown world, that section is referred to as frontmatter and it contains the file's metadata written in YAML format. That metadata is used to organise and reference our posts. All will become clear.
If you are using your own Markdown files, make sure to add some frontmatter that contains the same fields as mine:
- title
- subtitle
- date (in
yyyy-mm-ddformat) - tags
A list of posts - the Homepage of our app
Ok, I think it's time to write some code. Our homepage is going to be a list of blog posts. We have our Markdown files in the posts directory so we need to grab the contents of that directory and render a list in the Homepage.
As a first step, open app/page.js in your editor and delete everything. Replace it with a React component that simply returns <h1>Home</h1>. You can call the component whatever you like. I chose Home. You should now have something like this - be sure to export the component as the default:
function Home() {
  return (
    <h1>Home</h1>
  )
}

export default Home
We are no longer referencing the styles in page.module.css so delete that too. Since we removed the global.css import in the Root layout file feel free to delete global.css too.
If you still have the server running the app should automatically refresh . If you stopped the server restart it with npm run dev. The homepage should now be showing Home in the top left corner.
Access to the file system
Next.js provides access to server funcionality and that includes the ability to access the file system. So we can use the fs library that is built into JavaScript and specifically the fs.readdirSync function.
We might need access to this functionality from more than one location so let's place it in its own module. In previous versions of Next.js the file system could only be accessed from server components so this wouldn't have been possible.
Create a directory in the root of the project called helpers and in there create a file called postHelpers.js containing this code:
// helpers/postHelpers.js

import path from 'path'
import fs from 'fs'

export const getListOfPosts = () => {
  const folder = path.join(process.cwd(), 'posts')
  const files = fs.readdirSync(folder)
  return files.filter(file => file.endsWith('.md'))
}
Here we are making use of JavaScript's path module to construct the path to the Markdown posts folder. The function process.cwd() is a handy utility that returns the path to the directory in which the process is running. We can then use path.join to tag on our posts directory.
fs.readdirSync returns an array of filenames. In the return statement, the filter method strips out any non-markdown files in case any have snuck in there (.DS_Store for example).
We can pull that array of filenames into the Home component. Update that file to match this:
- import the
postHelpersmodule - call
getListOfPosts()
// app/page.js

import { getListOfPosts } from "@/helpers/postHelpers"

function Home() {
  const posts = getListOfPosts()
  console.log(posts)

  return (
    <h1>Home</h1>
  )
}

export default Home
Here we are logging the array to the console. Since files in app are server files, the array will be logged into the server console not the browser console. Look in the terminal window where you server is running and you should see an array of filenames. Mine outputs [ 'example1.md', 'example2.md', 'example3.md' ].
Listing links to the individual posts
Now we know that we can grab a list of relevant files we can render that list in the homepage. We could adapt the JSX that is returned from app/page.js to render that list but I think it's good practice to separate your React component files from your page files.
Create a components directory in the root of the project and add a file called BlogIndex.jsx. In there we are going to create a React component that takes the array of posts as a prop and renders a list of links to those individual posts.
// components/BlogIndex.jsx

import Link from "next/link"

function BlogIndex({ posts }) {
  return (
    <section>
      {
        posts.map(post => (
          <article key={post}>
            <Link href={`blog/${post}`}>
              {post}
            </Link>
          </article>
        ))
      }
    </section>
  )
}

export default BlogIndex
Back in app/page we need to replace the temporary <h1> with our new BlogIndex component to which we pass the posts array. BlogIndex also needs to be imported and we can delete the console.log:
// app/page.js

import BlogIndex from "@/components/BlogIndex"
import { getListOfPosts } from "@/helpers/postHelpers"

function Home() {
  const posts = getListOfPosts()

  return (
    <BlogIndex posts={posts} />
  )
}

export default Home
In the browser you should now see a list of your Markdown files each of which is a link to localhost:3000/blog/<filename>. Clicking the links just opens a 404 page because we have yet to build the individual post page. We will get to that next.
I want to highlight a couple of things before we move on though:
1. Static Generation
By default, Next.js renders pages statically at build time. That means that pages are rendered as static HTML files which are then cached.
That is perfect for a blog application such as this. The blog pages are not dynamic: none of a page's content will change as a result of user interaction or the passage of time. Since this is the default behaviour we don't need to do anything special to enjoy the benefit of static rendering.
This is one of the main advantages of using Next.js. If you View Page Source for localhost:3000/ (right click the page in the browser and choose the option from the context menu) you will see the HTML that renders the page. That means that search engines will see that HTML too.
If this were a normal React app all you (and Google!) would see is <div id="root"></div>.
And static HTML is very quick to serve because it requires very little server compute time. Hopefully you will have noticed how fast the pages in this blog are rendered.
Comparison with the Pages Router
If you have used Next.js before with the Pages Router you may be wondering what has happened to
getStaticProps(). well, it's no longer needed. Using the App Router, data can be fetched from anywhere in the app - not just in server components - and the page will still be statically rendered.
2. Client-side navigation and link pre-fetching
We have used the Next.js <Link> component to build the links. We could use a simple HTML <a> tag to do the same thing. But that would lead to a new request being made to the server and a page refresh meaning we lose anything held in state.
The <Link> component prevents that happening. It facilitates client-side navigation between routes (ie. the way that you are used to with React) AND it preloads link routes in the background before they are clicked. How cool is that?
Individual post page
Quick recap: our homepage shows a list of clickable links, one for each of our Markdown files. But clicking the links sends us to the Next.js default 404 page. That's because we have not yet defined the routes for the individual blog posts. We are going to do that now.
There are three blog posts called imaginatively: example1.md, example2.md & example3.md. The route to each of them will be /blog/<slug>, where <slug> is the filename minus the .md extension. Since there are only 3 posts, we could create separate routes for each. But we're not going to do that. Manually hard-coding routes like that will very quickly become unmanageable as the number of posts increases. Instead, we need to dynamically generate routes based on the filenames that exist in the posts directory.
Creating dynamic routes
Let's get back to writing code and I will explain what's going on as necessary during the process. It might be worth revisiting the File-based routing section above before moving on.
We know from the section above what the route to our individual blog pages will be. To achieve that we need to create a new directory inside app called blog - which will form the first segment of the route - and within blog create another directory called [slug]. Yes, the square brackets are part of the directory name. That's what tells Next.js that this is a dynamic route: the final segment of the file path depends on the blog post being requested.
Inside the [slug] directory create a page.js file to hold the page component and add this code:
// app/blog/[slug]/page.js

function Post() {
  return (
    <div>
      <h1>This is the Post page</h1>
    </div>
  )
}

export default Post
And make a small edit to BlogIndex so that the href of each Link strips out the file extension, leaving just the 'slug':
// components/BlogIndex.jsx - extract

<Link href={`blog/${post.replace('.md', '')}`}>
Now, on clicking any of the links you should see a new page with the heading This is the Post page. This is just a temporary measure to demonstrate that we are hitting the route. The page component is currently ignoring the slug.
To make use of the slug we need to be able to extract it from the url. Next.js passes some props to page components automatically. One of those props is called params which is an object. The params object has properties named after dynamic segments in the route. Destructure params from props in app/blog/[slug]/page.js and log it to the console:
// app/blog/[slug]/page.js

function Post({ params }) {
  console.log(params)

  return (
    <div>
      <h1>This is the Post page</h1>
    </div>
  )
}

export default Post
Clcking any of the links in homepage will now log the params object in the terminal window where the server is running. If I click example3 this is logged:
{ slug: 'example3' }
We can now use that slug to fetch the contents of that file.
Accessing the post that the slug refers to
We can use fs.readFileSync() to fetch the blog post content from the file in the posts directory that matches the slug. Open helpers/postHelpers.js and add a getPostContent function:
// helpers/postHelpers.js - extract

export const getPostContent = (slug) => {
  const file = path.join(process.cwd(), 'posts', slug) + '.md'
  const content = fs.readFileSync(file, 'utf8')
  return content
}
A lot of this looks familiar from the getListOfPosts function. We have to remember to add the .md extension because it isn't included in slug and we need to reference a specific file. And we are making use of the fs module's readFileSync function to grab the content of that file.
Note Passing a non-existent filename to
readFileSyncwill cause the app to error. So, in a live environment, the call to that function should be wrapped in a try/catch block to catch errors and redirect to, say, a 404 page.
We can call getPostContent from the [slug] page like this:
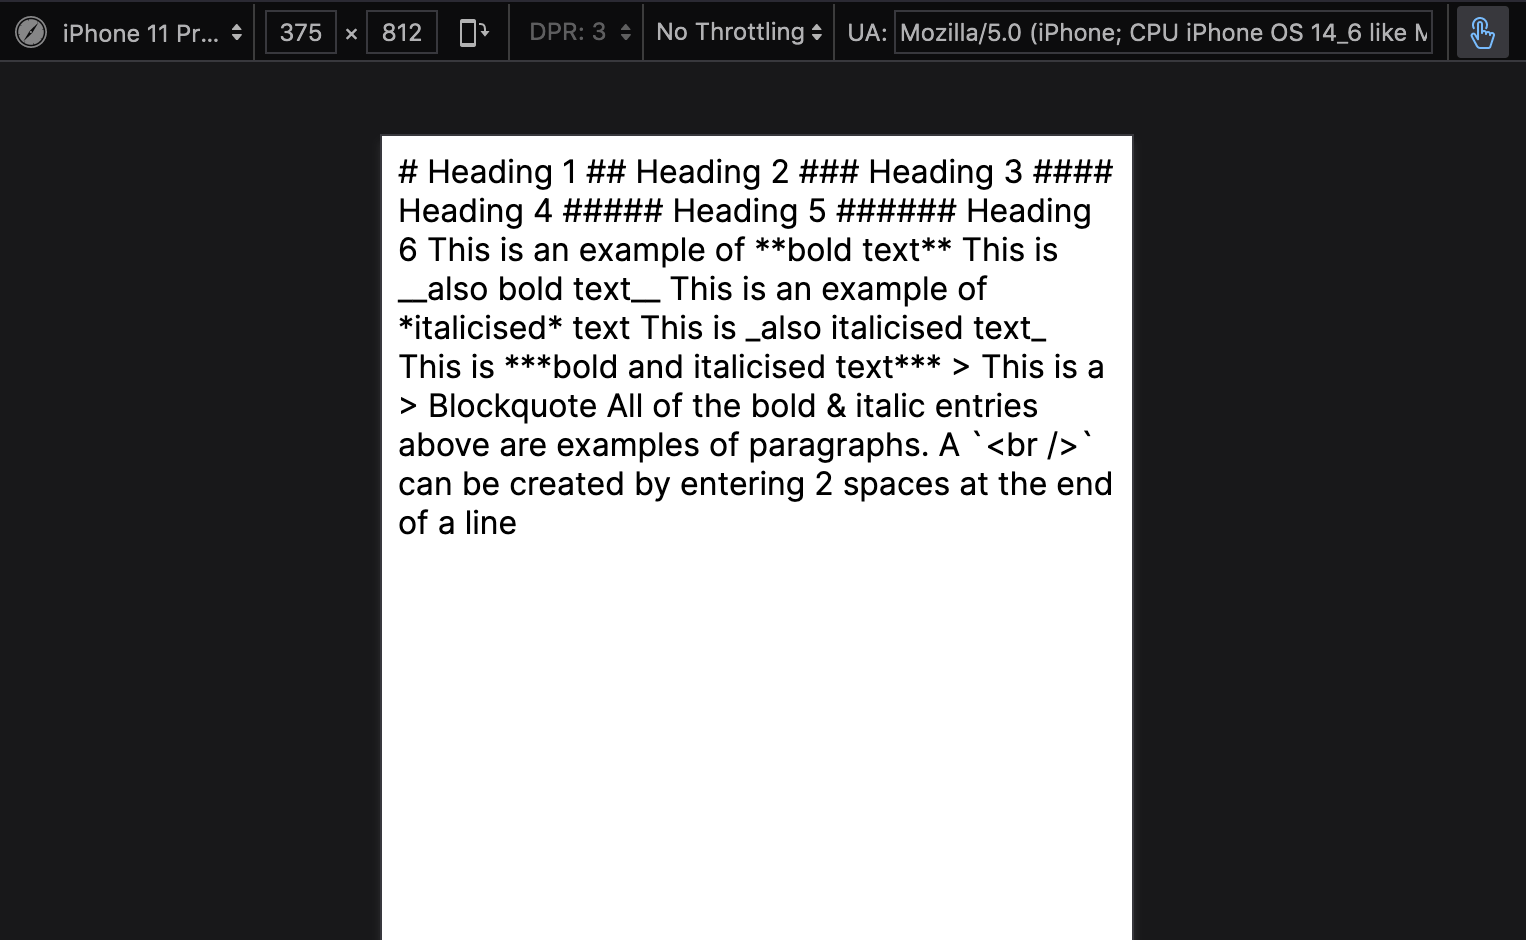
// app/blog/[slug]/page.js

import { getPostContent } from "@/helpers/postHelpers"

function Post({ params }) {
  const content = getPostContent(params.slug)

  return (
    <div>
      {content}
    </div>
  )
}

export default Post
Clicking on a link will now open a page that renders a string containing the Markdown content of the relevant file. So we are getting somewhere: we are able to access relevant Markdown content. There are clearly things still to do:
- the content that is rendered is raw Markdown, which is pretty useless: it needs to be parsed into HTML
- and it consists of both the file content and the frontmatter. That is metadata that shouldn't be output as part of the content.
We will address those shortcomings soon. Before we do that, we are going to look at some aspects that are specific to Next.js and the way that it renders content.
How to render dynamic pages statically
We looked at the advantages of static generation earlier and came to the conclusion that it's the perfect rendering solution for a blog application. So we would like to have all of our pages statically generated at build time - including our dynamic pages (like those rendered by the [slug] page)
We can easily see the extent to which our app is statically generated. When we run the build script (npm run build), Next.js outputs details of how all of the pages are rendered.
Here is the output that I see:
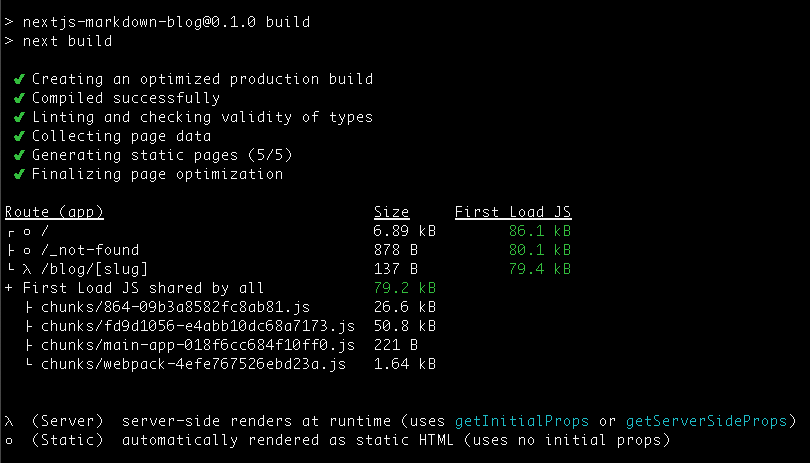
Notice the key at the bottom of that display. The small o symbol denotes statically rendered routes, while the lambda symbol denotes routes that are server-side rendered. Further up you can see the lambda symbol alongside /blog/[slug] indicating that that route - ie. all of our dynamic, single post pages - are server-side rendered.
What is server-side rendering?
Routes can be rendered on the server on a request by request basis during run time. Compare that to static rendering which takes place at build time with the resulting pages being cached ready to be served when requested. Server-side rendering involves more server compute time and generally leads to an inferior user experience, when compared to statically rendered routes, because of the short delay in serving pages.
Server-side rendering is a better solution than client-side rendering (ie. the default React behaviour) if SEO is important but we still want as many routes as possible to be statically generated.
The built-in generateStaticParams function
Next.js needs to know, at build time, all of the routes that are to be built statically. Where routes are generated dynamically, like our [slug] routes, we need to build an array of all the urls that a user might request and hand that to Next.js so that those urls can be included in the static generation process at build time. For our purposes, that equates to the paths to all of the Markdown files in the posts directory. Since that number can change over time as more posts are added, we need to be able to generate a list of those paths dynamically.
The Next.js team has thought of this and provided the generateStaticParams function. We can use this function, in conjunction with dynamic route segments (like [slug]), to statically generate routes at build time rather than on-demand at request time as is currently the case in our app.
generateStaticParams should return an array of objects representing the dynamic segments for a given route, with the segment variable (eg. slug) mapping to the actual segment value for that specific route (eg, example1). We already have a getListOfPosts helper function that returns an array of filenames in the posts directory that have a .md extension, so we will be able to call that function from within generateStaticParams
The generateStaticParams function itself must be located in the same page file as the dynamic page component - in this case that means app/blog/[slug]/page.js - and it must be exported so that Next.js can run it at build time to generate all the routes that our Post component might be called on to render. It must also be marked as async.
Add this to app/blog/[slug]/page.js outside the Post component:
export const generateStaticParams = async () => {
  const posts = getListOfPosts()
  return posts.map(post => { slug: post.slug })
}
Run npm run build again, and have a look at the output. Here's mine:
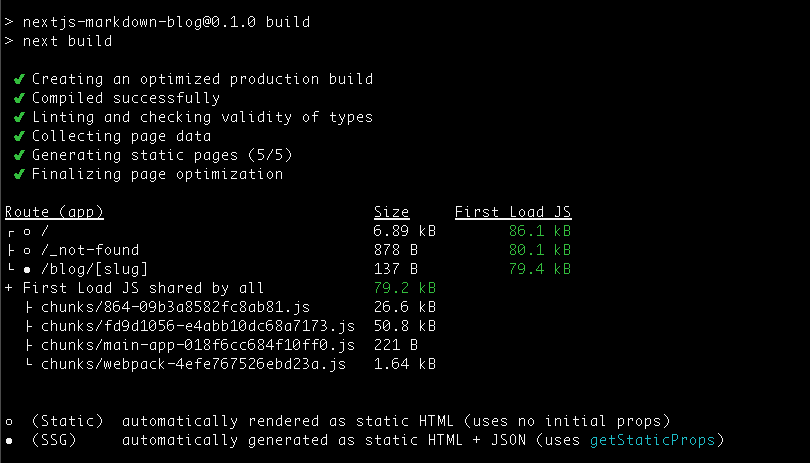
The lambda server-side rendering symbol no longer appears. In its place we see a solid circle representing SSG, which is static generation. And that symbol appears alongside /blog/[slug]. So we are successfully rendering all of the routes statically at build time.
Now we can get back to the individual blog post page and see how the markdown string is handled.
Separating content from frontmatter
Quick recap: when we click a link in the homepage we are taken to the page for that specific blog post, based on the slug. But the page simply shows the raw string of Markdown that was extracted from the file, including the file metadata in the frontmatter section.
We are going to use a NPM package called Gray Matter in the postHelpers module to separate the Markdown string into content and frontmatter.
npm install gray-matter
At the top of helpers/postHelpers:
import matter from 'gray-matter'
In the getPostContent function in that same module, rather than simply return the content string that is pulled from the Markdown file, we will pass that string as a parameter to the matter() function.
matter() returns an object which has the following properties:
content- the string of Markdown content excluding the frontmatterdata- itself an object containing the frontmatter as defined in the Markdown file.
Imagine this Markdown file:
---
title: This is a Markdown file
date: 2023-10-01
tags:
  - markdown
  - blog
---

# This is an example

This is the first paragraph
If we pass that to matter() we will get back this object:
{
  content: '\n' +
    '# This is an example\n' +
    '\n' +
    'This is the first paragraph\n' +
    '\n',
  data: {
    title: 'This is a Markdown file',
    date: 2023-10-01,
    tags: [ 'markdown', 'blog' ]
  }
}
All we need to change in getPostContent is the return statement:
export const getPostContent = (slug) => {
  const file = path.join(process.cwd(), 'posts', slug) + '.md'
  const content = fs.readFileSync(file, 'utf8')
  return matter(content) // previously: return content
}
Small change required in app/blog/[slug]
Since getPostContent now returns an object, we need to destructure content from that returned object in our Post component.
// skipped some lines above

function Post({ params }) {
  const { content } = getPostContent(params.slug) // <--- Changed line

  return (
    <div>
      {content}
    </div>
  )
}
Now when we click a link on the homepage, the individual post page displays just the content string. If we want to display some of the frontmatter metadata, we can do. We can also destructure data from the object returned by getPostContent and use its properties in our component.
Parsing the Markdown
To convert the Markdown file content string into meaningful HTML we are going to use another NPM package called React Markdown. As its name suggests, it is specifically tailored towards Markdown files used in React projects.
npm install react-markdown
React Markdown provides a React component that we can add to our Post component and pass to it the content as a child.
import ReactMarkdown from 'react-markdown'

// skipped some lines

function Post({ params }) {
  const { content } = getPostContent(params.slug) // <--- Changed line

  return (
    <ReactMarkdown>
      {content}
    </ReactMarkdown>
  )
}
Simply replacing the wrapping <div> with a wrapping <ReactMarkdown> component changes this:
to this:
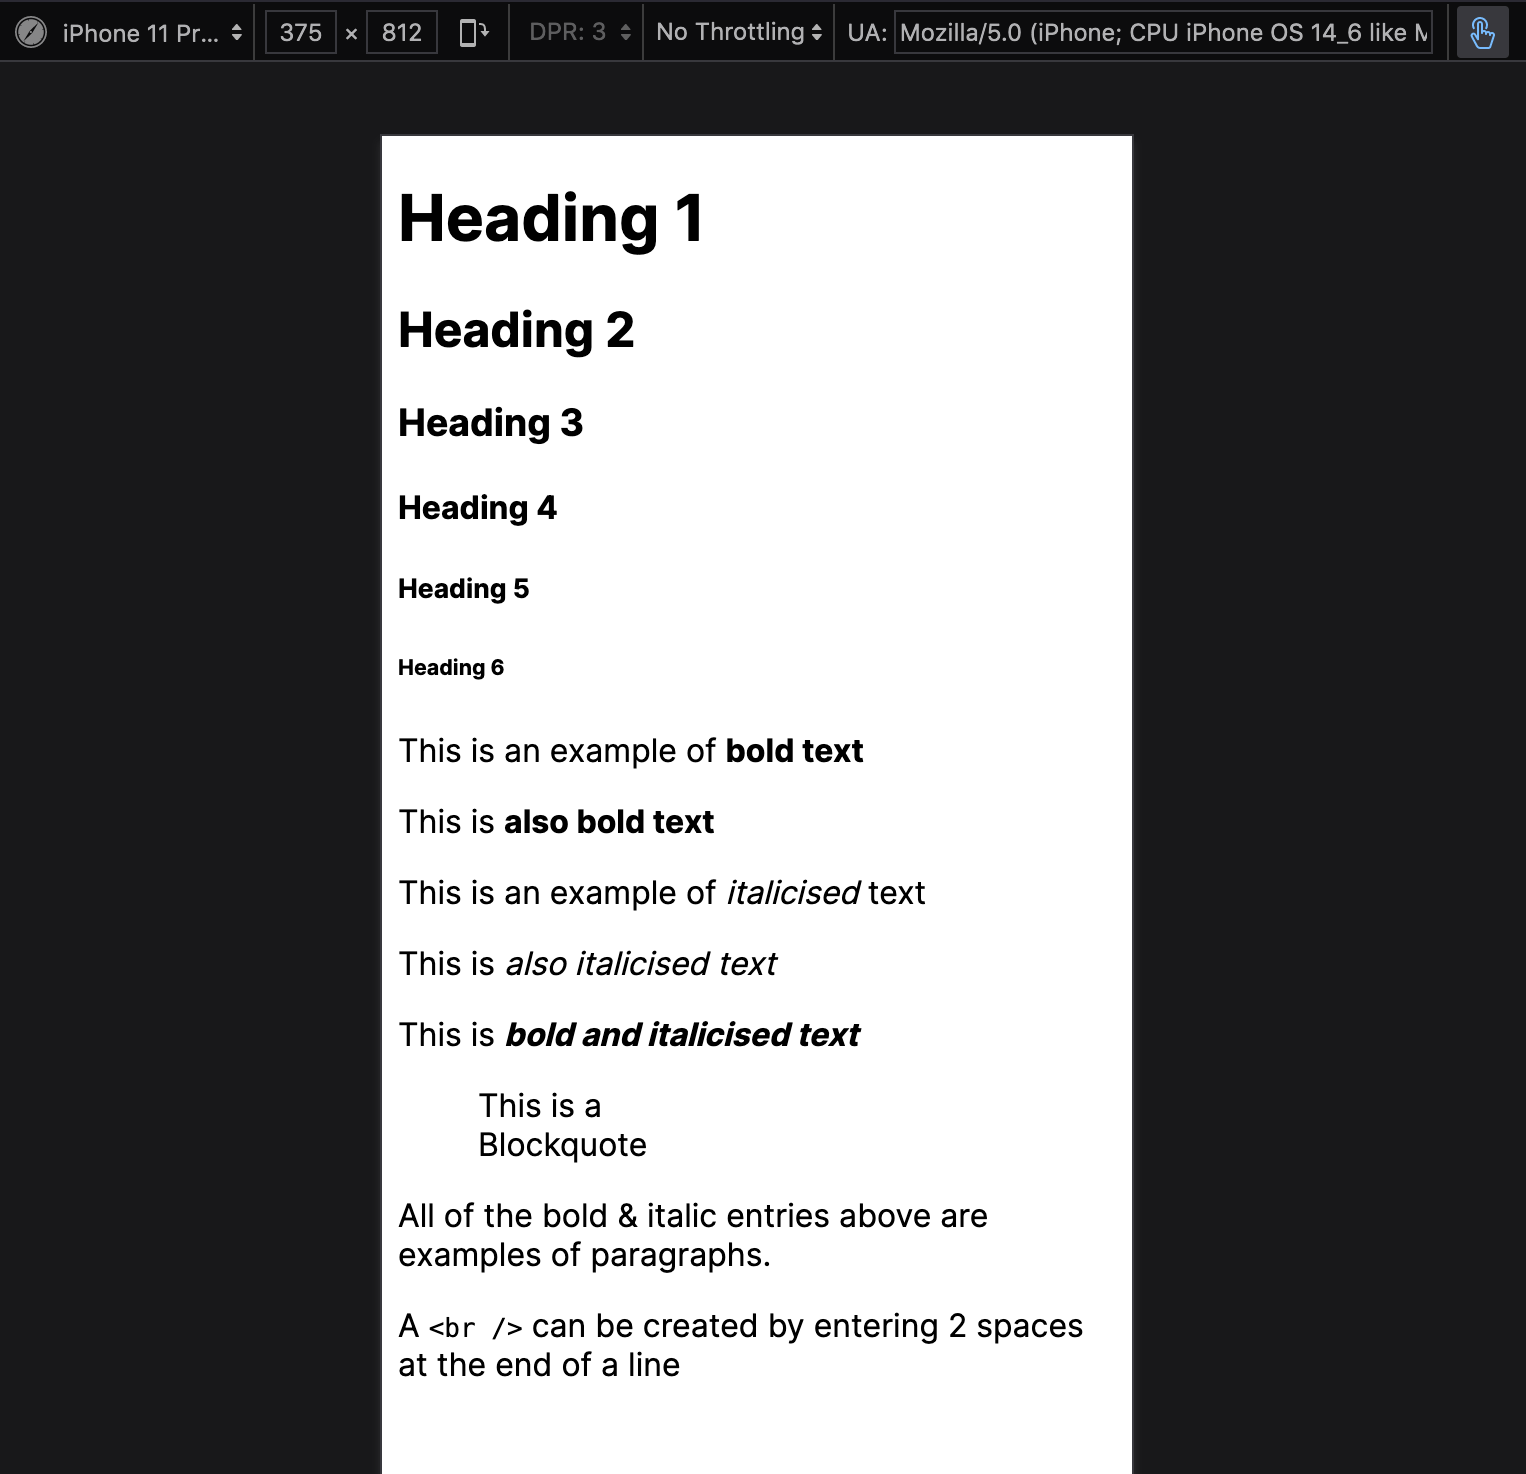
And if you View Page Source you can see the HTML that generates that page, so it is still available to search engines.
This is only scratching the surface of what react-markdown is capable of. Check out this post about generating custom HTML elements from your Markdown to find out more.
Making use of metadata in an individual post
We are going to extend the individual blog post component. Following the lead set when we created the blog homepage, let's create a separate React component rather than clutter up the Page file.
In the components directory create a BlogPage.jsx file with a functional React component that:
- takes props:
contentanddata, and - returns a React fragment containing:
- h1 containing the metadata title
- h2 containing a human-readable date derived from the metadata date
- a
<RectMarkdown>component that parses the content.
import ReactMarkdown from 'react-markdown'

function BlogPage({ content, data }) {
  return (
    <>
      <h1>{data.title}</h1>
      <h2>{new Date(data.date).toLocaleDateString()}</h2>
      <ReactMarkdown>
        {content}
      </ReactMarkdown>
    </>
  )
}

export default BlogPage
Then update our app/blog/[slug] file to call this component and pass content and data to it:
import { getListOfPosts, getPostContent } from "@/helpers/postHelpers"
import BlogPage from '@/components/BlogPage'

export const generateStaticParams = async () => {
  const posts = getListOfPosts()
  return posts.map(post => { slug: post.slug })
}

function Post({ params }) {
  const { content, data } = getPostContent(params.slug)

  return (
    <BlogPage content={content} data={data} />
  )
}

export default Post
Updating the links on the index page
The blog index page works ok: clicking a link opens the individual post page for the related Markdown file. Trouble is, the link text is simply the Markdown filename because getListOfPosts returns an array of filenames ending .md.
Now that we know how to access the Markdown file frontmatter, we could use the post title as the link text instead of the raw filename.
We will need to make some fundamental changes to the getListOfPosts function in helpers/postHelpers so open that file in your editor.
At the moment getListOfPosts extracts a list of all files in the posts directory and returns an array of those that have a .md extension.
Instead we want it to:
- loop through that list of
.mdfiles - pull in the content of each file
- pass the content to the
matterfunction (from the Gray Matter module) - package up the frontmatter (ie. the
dataproperty returned frommatter()) together with a 'slug' (the filename minus '.md') into an object - add that object to an array
- return the array of objects
export const getListOfPosts = () => {
  const folder = path.join(process.cwd(), 'posts')
  const files = fs.readdirSync(folder)
  const mdFiles = files.filter(file => file.endsWith('.md'))

  return mdFiles.map(filename => {
    const contents = fs.readFileSync(path.join(folder, filename), 'utf8')
    const { data } = matter(contents)

    return {
      ...data,
      slug: filename.replace('.md', '')
    }
  })
}
Changing the BlogIndex component
Since we have changed getListOfPosts to return an array of objects, not strings like it used to, we will need to make some minor changes in our BlogIndex component. i have retained the old code in the commented block to make it easy to see the changes
import Link from "next/link"

function BlogIndex({ posts }) {
  console.log(posts)
  return (
    <section>
      {
        // posts.map(post => (
        //   <article key={post}>
        //     <Link href={`blog/${post.replace('.md', '')}`}>
        //       {post}
        //     </Link>
        //   </article>
        // ))

        posts.map(post => (
          <article key={post.slug}>
            <Link href={`blog/${post.slug}`}>
              {post.title}
            </Link>
          </article>
        ))

      }
    </section>
  )
}

export default BlogIndex
Conclusion
That brings us to the end of this article. If you have followed the steps you should now have a basic blog application up and running. You can add new blog posts simply by adding Markdown files to the posts directory and the app will update itself.
Here is a summary of the things we have covered:
- how to set up a Next.js application using the new App Router
- file-based routing and how that works in Next.js apps
- how to create blog posts using Markdown syntax
- how to create a list of available blog posts that link to individual post page
- the different ways that pages can be rendered in Next.js
- how to separate post metadata from post content
- how to convert Markdown content to valid HTML
Next steps
- Consider how this app could be styled. Next.js is very flexible: it is set up to work with CSS modules but you don't have to use that method. You could equally use CSS-in-JS or even vanilla CSS.
react-markdownis a very powerful module. We have barely scratched the surface of what you can do with it. For example, you can use it to define custom components that transform the standard HTML elements (thatreact-markdowngenerates by default) into UI components that you have more control over. I have written an article that covers that in detail In the blog that you are reading now, I create the table of contents on the fly based on the level-2 headings that appear in the Markdown.